
Introduction
Standing in front of a century-old brick facade holding a 30-pound cast bronze plaque with no clear plan is a situation that happens more often than it should. The reality is that small interior plaques on drywall or wood are genuinely manageable for a careful DIYer. But once you add weight, exterior exposure, masonry substrates, or commercial code requirements, the job gets technically demanding fast.
Wall material variability alone creates most of the complexity. Drywall, hollow tile, solid brick, limestone, concrete, and granite each require different fasteners, drill techniques, and adhesives. Get the wrong combination and the plaque pulls away from the wall — sometimes years later, when the fix is far more costly and disruptive than the original installation.
This guide covers everything you need to make the right calls:
- How to select a mounting method based on your specific wall substrate
- What tools and site prep are required before you touch a drill
- A step-by-step installation sequence
- The most common errors that cause plaques to fail
Seiz Sign Company, a licensed sign contractor serving Arkansas since 1908, installs architectural bronze plaques for government buildings, universities, hospitals, churches, and commercial facilities across the state — and the guidance here draws directly from that field experience.
Key Takeaways
- Use concealed stud mounting for masonry, brick, or stone; rosette or toggle systems for drywall, hollow tile, or wood
- Two-part epoxy is required for permanent installs — silicone caulk is not a substitute
- Never pre-drill holes before the plaque arrives; stud positions vary by size and shape
- Use rotary-only mode for hollow brick; hammer drilling for solid masonry or stone (with rated bits)
- Plaques over ~20 lbs should have professional installation to verify the wall can carry the load
Choosing the Right Mounting Method for Your Bronze Plaque
Mounting method selection is the most consequential pre-installation decision. It must account for wall substrate, plaque weight, interior vs. exterior placement, and whether the plaque might ever need to be moved. Choose the wrong method for your substrate, and you're looking at patched holes, re-drilled anchors, or a plaque that won't stay flush.
Concealed Stud (Blind) Mounting
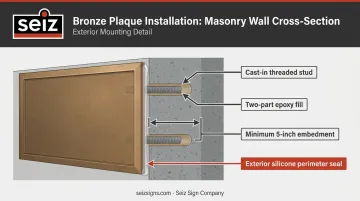
Threaded studs are cast into the back of the plaque during production. Holes are drilled into the wall to match those stud positions, and the studs are secured with two-part epoxy — no hardware visible from the front.
According to Saxton Bronze's mounting specifications, this is the preferred permanent mounting method for brick walls, stone walls, and masonry surfaces. Smaller flat-backed plaques can be drilled and tapped for studs without rear bosses.
This method is best for:
- Exterior brick, masonry, stone, and concrete facades
- High-traffic or high-theft-risk locations (parks, government buildings, public monuments)
- Any installation where visible hardware would compromise the finished appearance
One critical constraint: stud placement is specific to each plaque's size and configuration. You cannot pre-drill holes based on estimated positions. The physical plaque must arrive before any drilling begins.
For exterior installations on solid masonry, concrete, or stone, the 2021 IBC Appendix H requires metal anchors, bolts, or expansion screws of at least 3/8 inch diameter, embedded at least 5 inches into the wall. Wood blocks are explicitly prohibited as anchors in masonry or concrete.
One substrate-specific note for stucco walls: use spacers and studs to prevent direct contact. Stucco contains corrosive minerals and additives that can damage the plaque's back surface over time.
Front-Face (Rosette or Screw) Mounting
Holes are drilled through the plaque face at the corners. Screws pass through into the wall with appropriate anchors. Decorative rosettes can cover the hardware for a cleaner appearance — though note that rosettes are compatible with screw mounts only, not other hardware configurations.
Hardware matched to substrate:
- Drywall and hollow walls — toggle bolts
- Brick and masonry — expansion sleeves with machine screws
- Wood and composite surfaces — standard wood screws
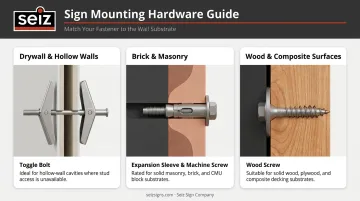
This method suits interior plaques well and makes future relocation straightforward. For exterior commercial installations, concealed stud mounting is preferred.
A Note on Adhesive-Only Mounting
Adhesive-only installation is a limited option — appropriate only for lightweight interior plaques on non-drillable finished surfaces like polished granite or marble. Construction adhesive alone should never be used for outdoor or heavy cast bronze plaques. Bronze plaque manufacturers do not recommend adhesive-only installation for exterior or load-bearing applications — the bond will fail under weather exposure and weight stress.
Tools, Materials, and Site Prerequisites
What You Need Before You Start
Essential tools and materials:
- Power drill (rotary for hollow brick and drywall; rotary hammer for solid masonry/concrete/stone)
- Drill bits matched to substrate — masonry bits for brick/concrete, natural stone bits (hammer-capable) for granite and marble
- Two-part epoxy resin (not standard silicone)
- Level
- Pencil or chalk marker
- Tape measure and masking tape
- Safety glasses
- Soft cleaning cloth
- Wall anchors or expansion sleeves matched to wall type
- Vacuum or compressed air for hole cleaning
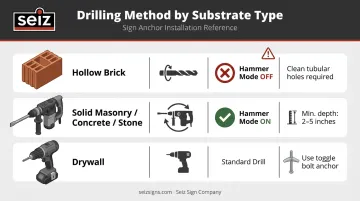
One item on that list deserves a closer look: drill mode. Fischer fixing guidance specifies that hollow brick must be drilled with hammer mode switched off — the impact action can fracture hollow sections and prevent anchors from seating. For solid masonry, concrete, and natural stone, hammer-mode drilling is appropriate with rated bits.
Site Prerequisites
Confirm all of the following before drilling:
- Wall structural integrity — inspect older masonry or brick for crumbling, spalling, or unstable mortar. Do not proceed on compromised surfaces
- Load capacity — verify the wall can support the plaque's weight at the chosen location
- Hidden utilities — use a stud finder or detection tool to identify pipes, conduits, or wiring behind planned drill points
- Historical district compliance — some Arkansas historic-district installations require landmark commission approval before any drilling or facade attachment
For exterior commercial installations in Arkansas, Seiz Sign Company provides site assessment, permit services, and zoning compliance review as part of its plaque installation work. This covers city sign code research, overlay-district approvals, and permit application submission across Arkansas.
Do not proceed if: the wall surface is unstable, the location is not load-bearing for the plaque weight, or the plaque has not yet arrived. Confirm stud positions from the physical plaque before marking any holes.
How to Install a Bronze Plaque on a Wall Step-by-Step
Installation follows a fixed sequence, and the steps that get skipped most often — rushing the drilling or bypassing adhesive curing — are the primary reason plaques fail years after they go up.
Prepare the Mounting Surface
Clean the wall surface thoroughly: remove dirt, dust, loose paint, and debris from the mounting area. Apply masking tape over drill points on delicate or finished surfaces to protect the wall finish during drilling.
If mounting on a freestanding stone panel or removable substrate, lay it flat on a padded surface before drilling. Working on a vertical surface makes centering difficult and complicates adhesive application during cure.
Mark and Drill the Holes
Hold the plaque against the wall at the intended mounting height — eye level is the standard recommendation for public-facing plaques. Use a level to confirm it's straight, then mark drill points through the stud openings or face holes with a pencil.
Drilling technique by substrate:
- Hollow brick — rotary drill only, hammer mode off, clean tubular holes
- Solid masonry, concrete, stone: rotary hammer with rated bits, 2–3 inches deep (minimum 5 inches for IBC-governed exterior installations)
- Drywall — standard rotary drill, sized for the toggle bolt anchor
After drilling, vacuum or blow all dust from the holes before inserting any hardware. Dust prevents epoxy from bonding properly and is a leading cause of anchor failure.
Apply Adhesive and Insert Fasteners
ITW Red Head A7+ epoxy and similar two-part anchoring epoxies have gel and cure times that vary significantly with temperature:
| Temperature | Gel Time | Full Cure |
|---|---|---|
| 90°F | 2.5 min | 45 min |
| 70°F | 5 min | 45 min |
| 50°F | 16 min | 90 min |
| 32°F | 35 min | 4 hours |
Mix epoxy per manufacturer instructions and inject or pour it into drilled holes immediately before inserting studs. For front-face mounting, insert anchors (toggle bolts or expansion sleeves) until flush with the wall surface before placing the plaque.
Do not substitute standard silicone caulk for epoxy. Silicone remains permanently flexible, allowing hardware to shift with temperature changes and moisture exposure — particularly problematic outdoors.
Mount and Align the Plaque
Press the plaque firmly and evenly against the wall, aligning studs or screw holes with the prepared anchors. For epoxy installations, hold or brace the plaque flat against the surface through the full cure period. Do not rely on the plaque to stay in place without support.
For screw-based front mounting, tighten screws gradually across all corners in sequence. Fully tightening one corner before moving to the next warps thinner plaques.
Post-Installation Checks
Before epoxy fully sets:
- Confirm level — an un-leveled plaque looks unprofessional and is very difficult to correct after cure
- Check all four corners are flush with no gaps between the plaque back and wall
- Gently test for movement — the plaque should feel completely solid
After installation:
- Wipe the face with a soft cloth to remove fingerprints and adhesive residue
- Apply a bead of clear exterior silicone around the full perimeter where the plaque meets the wall
That silicone seal is especially important for exterior installations. Without it, moisture works behind the plaque over time, accelerating hardware corrosion and damaging the wall surface underneath.
The National Park Service's guidance on outdoor bronze plaque conservation recommends periodic cleaning and waxing to retard corrosion. A thin coat of carnauba wax applied after installation helps protect the finish and slows natural patina development on new plaques.
Common Installation Problems and Fixes
Plaque Tilts or Is Not Level After Installation
Cause: Mounted on a vertical surface without confirming level, or epoxy began curing before alignment was checked.
Fix: If epoxy is still soft, adjust immediately and re-check level. If fully cured and significantly off, carefully cut the epoxy bond with a thin blade or chisel, remove the plaque, clean both surfaces, and re-mount with fresh epoxy — bracing in position through the full cure.
Plaque Pulls Away from the Wall Over Time
Cause: Silicone used instead of two-part epoxy; holes drilled in hammer mode on hollow brick creating fractured, irregular holes that don't grip studs; installation done on a vertical surface without bracing during cure.
Fix:
- Remove the plaque and clean all old adhesive from the studs and holes.
- Re-drill clean holes if the existing ones are fractured or damaged.
- Re-mount with two-part epoxy and brace in position until the epoxy fully cures.
Hardware Doesn't Fit or Holes Don't Align
Cause: Holes were pre-drilled before the plaque arrived based on assumed stud positions, or the wrong drill bit diameter was used.
Fix:
- Fill incorrect holes with masonry filler or epoxy and allow full cure before re-drilling.
- Use the physical plaque as the drilling template — mark hole positions directly from the plaque, not from separate measurements.
Pro Tips for Installing Bronze Plaques Effectively
Sequencing and scheduling:
- Wait to receive the plaque before purchasing hardware or drilling — stud count, placement, and hole diameter vary by plaque size and manufacturer
- For outdoor installations, schedule during mild, dry weather (50–80°F range). Cold temperatures significantly extend epoxy cure time; extreme heat compresses the working window, reducing time to align the plaque before gel begins
Documentation and finishing:
- Photograph the completed installation from multiple angles as a permanent record
- Apply carnauba wax to the bronze face after installation to protect the finish and slow patina formation
- Seal the wall-plaque perimeter with clear exterior silicone on all outdoor installations
When to bring in a professional:
For large or heavy cast bronze plaques, exterior commercial facades, historic structures, or any installation requiring permits, working with a licensed sign contractor eliminates structural risk and ensures compliance with local building codes.
Arkansas businesses can contact Seiz Sign Company — a licensed contractor with over 115 years of experience — for commercial and institutional plaque projects. Seiz handles permit services, site assessment, and statewide installation from design consultation through casting and final mounting.
Frequently Asked Questions
What is the best way to mount a bronze plaque on a brick wall?
Concealed stud mounting with two-part epoxy is the standard approach. Threaded studs cast into the plaque's back insert into pre-drilled holes and bond with epoxy, leaving a clean face with no visible hardware. IBC Appendix H requires anchors of at least 3/8 inch diameter embedded a minimum of 5 inches for solid masonry.
Can I install a bronze plaque myself, or should I hire a professional?
Small interior plaques on drywall or wood are manageable for a careful DIYer with the right tools. Large, heavy, or exterior commercial plaques — particularly on masonry or historic surfaces — are better handled by a licensed installer to ensure safe, structurally sound, and code-compliant results.
What adhesive should I use to mount a bronze plaque on a wall?
Two-part epoxy resin is the correct choice for permanent installations, especially outdoors or for heavier plaques. Standard silicone caulk stays flexible and allows hardware to shift over time with temperature changes and moisture, which allows the plaque to shift and eventually pull away from the wall.
How do I prevent moisture damage behind a wall-mounted bronze plaque?
After mounting, run a continuous bead of clear exterior silicone around the full perimeter where the plaque meets the wall. This seals out water that would otherwise accelerate corrosion of the mounting hardware behind the plaque.
Do I need a permit to install a bronze plaque on a building exterior?
Permit requirements are jurisdiction-specific. Commercial or institutional exterior installations often fall under local sign codes and may require building department approval — particularly in historic districts. A licensed sign contractor can confirm requirements for your specific site and jurisdiction.
How heavy can a bronze plaque be before it requires special mounting?
Cast bronze is dense, and plaques over approximately 20 lbs require heavy-duty hardware, deeper anchor holes, and two-part epoxy — plus professional installation to confirm the wall substrate can safely carry the load long term.